Download
The downloads you've been waiting for!
Nextech's Android Application
- Live Online Classes & Webinars
- Recorded Past Sessions
- Free Content Accessible
- Topic Wise Notes
- Topic Wise Videos
- Topic Wise Assignments
- Integrated Coding Compiler
- Topic Wise Tests
- Performance Analysis
- Digital Certifications
- Certificate Online Verification
- In-app Chat & Community Support
To Fabricate your technical skills, We offer –
Nextech Infosystems Android Application is available on Google Play Store.
Join us on a journey of discovery, growth, and success. Your educational goals are within reach, and Nextech Infosystems is here to guide you every step of the way.
-
Additional Information
Nextech Infosystems fetching the 9+ years of educational benefactions online.
This App offers Live Online Classes, FREE Demo Sessions, Study Materials in the form of Notes, Videos and Test Series on various Topics, which will be helpful for Academics, Coding Interviews or Programming Contest Preparations and many more things.
This App is NOT ONLY for current Nextech’s (Classroom/Digital) students.This App will also be very helpful for those who wants to conquer Programming Concepts - Practically and Logically.
Using this App students can attend Live Sessions, read study notes, solve Assignments or topic wise Tests, go through Videos, etc. Not only this, but you will also get Performance Analysis of each of your test to check your overall progress, and chat with us anytime.We have Free as well as Paid Courses, Test Series, etc. for you. You can make use of any of the feature of this App, to fulfil your need. We will help you to stay updated with every important subjects and next-generation technologies.
Once you joined any of the class, you can access the recorded videos of past Live lectures and attend the upcoming Live online classes in parallel. You can opt for any particular topic/chapter of your choice from several pre-scheduled lectures, preloaded notes, go through assignments, videos, and test, anything you want.
The app is compatible with all the Android mobiles & tablets.
To start your learning, follow the steps:
- 1- Download the Nextech Infosystems App from the Play Store.
- 2- Sign Up With the details of your name, contact number, email, etc.
- 3 Select / Tapon any of the feature you want. That’s it..!
User Interface of the Nextech Infosystems App is very easy and user friendly, you can easily access the app and navigate to any particular section without any difficulty.
So, connect with us and get ready for your academic exams, competitive programming, interviews, and coding rounds for placements, etc.
WE GIVE YOU LIGHT
To always shine while following your own PATH, and To build a better, stronger, wiser, greater and more loving YOU.
About Nextech Infosystems:
Due to its dynamism and enthusiasm, Nextech Infosystems has succeeded in maintaining tradition as well as bringing in innovation. Since 2011, our institution has sought and managed to offer its students practical, exciting, and intensive studies, thanks to its remarkable teaching staff that possess excellent academic and professional qualifications.
Today, Nextech Infosystems offers various pieces of training, which provide our aspirants with ample opportunities. Our trainees find at our institution the energy and skills necessary to pursue successful careers.
We are looking forward to welcoming you, and we will make sure that your career begins the exact moment you step in at Nextech Infosystems.
Net Protector Antivirus
Net Protector Antivirus (NPAV) is a trusted solution for virus protection and internet security. It safeguards your system from malware, ransomware, and other cyber threats while ensuring smooth system performance.
It offers comprehensive protection for Windows PCs, with easy installation, periodic updates, and real-time monitoring to keep your system safe.
NPAV is also equipped with features such as email scanning, website protection, and cloud-based updates for the latest threat detection.
To install or renew NPAV, follow the instructions below:
-
Installation or Renewal Guide
Follow the detailed step-by-step guide to install or renew Net Protector Antivirus:
-
1. Download the NPAV Installer: Click the download button above if NPAV is not already installed on your device. If NPAV is already installed, proceed to step 5.
-
2. Launch the Installer: Locate the downloaded file and double-click it to start the installation process.
-
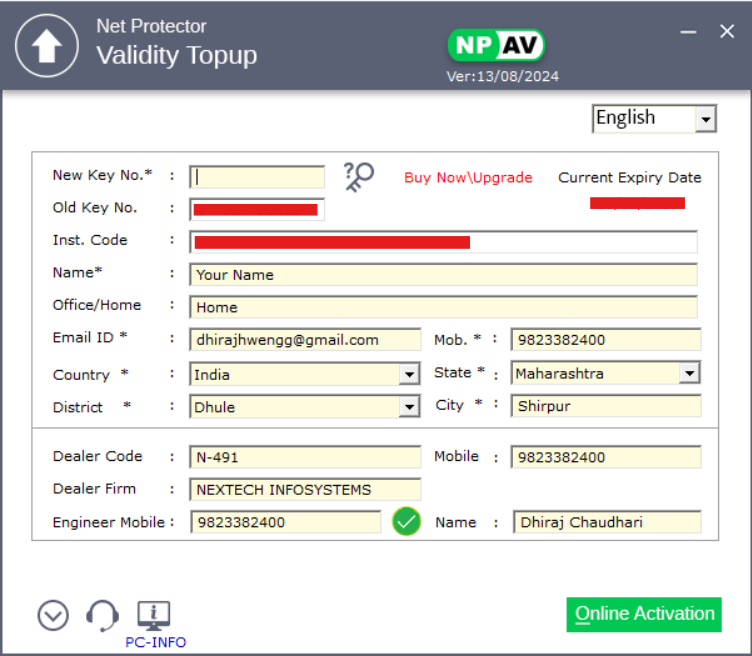
3. Enter Dealer and Engineer Details: During the installation process, you will be prompted to enter the following details:
- Dealer Code: N-491
- Dealer Name: Nextech Infosystems (If asked)
- Engineer Name: Dhiraj Chaudhari
- Engineer Contact: 9823382400
-
4. Follow On-Screen Instructions: Complete the installation process by following the on-screen prompts. When asked, click "Online Activation" to activate your NPAV license. After successful installation, reboot your computer to apply the changes and enjoy full protection for your device.
-
5. Already Have NPAV Installed? If NPAV is already installed on your device, follow these steps to renew:
- Run the Net Protector Antivirus software.
- Click on the *"Topup Validity"* button.
- Enter the New Key, Dealer, and Engineer Details as mentioned above.
- Click "Online Activation" to renew your license.
- Once the renewal is complete, restart your PC to apply the changes and enjoy full protection.
For any assistance or support, feel free to contact us at any time!
-
WinRAR
WinRAR is a powerful archive manager that can compress files to save space and reduce transmission costs. It can also decompress RAR, ZIP, and other files downloaded from the internet and create new archives in RAR and ZIP file formats.
WinRAR is available for Windows and includes a wide range of features for file compression and extraction.
WinRAR is a popular file archiver utility for Windows. It can create and view archives in RAR or ZIP file formats, and unpack numerous archive file formats.
WinRAR supports creating encrypted, multi-part and self-extracting archives, making it a versatile tool for file management and distribution.
-
Description and How to install guide?
WinRAR is a popular file archiver utility for Windows. It can create and view archives in RAR or ZIP file formats, and unpack numerous archive file formats.
WinRAR supports creating encrypted, multi-part and self-extracting archives, making it a versatile tool for file management and distribution.
To install WinRAR, download the installer using the button above and follow the installation instructions provided. Ensure your system meets the minimum requirements for the selected version.
With WinRAR installed, you can efficiently manage your files, compressing them to save space and decompressing them for use.
Step-by-step guide to install WinRAR:
-
Download WinRAR Installer: Click on the download button above to download the installer.
-
Launch the Installer: Locate the downloaded installer file and double-click on it to launch the installation wizard.
-
Follow Installation Steps: Follow the prompts in the installation wizard to complete the setup process. Accept the license agreement, choose the installation directory, and proceed with the installation.
-
Complete the Installation: Once the installation is complete, click "Finish" to exit the installer.
You can now use WinRAR to manage your compressed files efficiently.
-
Turbo C++ IDE
-
Setup 1 is for
users with Windows 7, Windows 8, or
Windows 8.1.
This setup is compatible with Windows 7, Windows 8, or Windows 8.1. -
Setup 2 is for
users with Windows 8.1, Windows 10,
or Windows 11.
This setup is compatible with Windows 8.1, Windows 10, or Windows 11.
Below are the links to download and install the Turbo C++ IDE software for your practice. There are two different setups available based on your Windows operating system version.
Please ensure that you select the correct setup based on your Windows operating system version.
-
Description and How to install guide?
Turbo C++ IDE is a legendary integrated development environment (IDE) that has played a significant role in the history of C++ programming. Developed by Borland, Turbo C++ IDE gained popularity for its simplicity, efficiency, and user-friendly interface. It became widely used for learning and practicing C++ programming on Windows platforms.
Turbo C++ IDE offers a comprehensive set of tools and features tailored to facilitate C++ programming. It includes a code editor with syntax highlighting, auto-indentation, and code folding, allowing developers to write clean and well-structured code. The IDE also offers a range of templates and code snippets to assist programmers in quickly implementing common C++ constructs.
This IDE supports multiple compilers, including the Turbo C++ compiler, which is known for its fast compilation speed and efficient code generation. It enables programmers to write code in the C++ language and compile it into executable programs or libraries.
Turbo C++ IDE provides an integrated debugger, allowing developers to step through their code, set breakpoints, and inspect variables during runtime. This helps in identifying and fixing logical errors and bugs in C++ programs.
Over the years, Turbo C++ IDE has seen several versions and updates. The original Turbo C++ was launched in the early 1990s and was followed by Turbo C++ 3.0. These versions had a significant impact on the programming community and were widely adopted by both beginners and experienced programmers.
Turbo C++ IDE supports various versions of the C++ language standard, depending on the compiler used. It is important to note that while Turbo C++ IDE is considered a classic choice, the original Borland development has not received official updates for modern Windows versions. As a result, it may have compatibility issues with newer operating systems.
How to Install Turbo C++ IDE: Step-by-Step GuideFollow these step-by-step instructions to install Turbo C++ IDE on your Windows machine:
-
Download Turbo C++ Installer: Search for a trusted source to download the Turbo C++ IDE installer. Keep in mind that there are community-supported versions available to ensure compatibility with modern Windows versions.
-
Launch the Installer: Locate the downloaded installer file and double-click on it to launch the installation wizard.
-
Choose Installation Directory: The installation wizard will prompt you to select the directory where Turbo C++ IDE will be installed. You can either choose the default directory or specify a custom location. Click "Next" to proceed.
-
Select Components: In this step, you may have the option to choose additional components or packages to be installed along with Turbo C++ IDE. Review the available options and select the ones you require. Click "Next" to continue.
-
Accept License Agreement: Read the license agreement carefully, and if you agree to the terms, select the checkbox indicating your acceptance. Click "Next" to proceed.
-
Choose Start Menu Folder: Select the folder where you want the shortcuts for Turbo C++ IDE to be placed in the Start menu. You can choose the default folder or create a new one. Click "Next" to continue.
-
Select Additional Tasks (Optional): The installation wizard may present you with additional tasks, such as creating desktop shortcuts or associating specific file types with Turbo C++ IDE. Customize these options based on your preferences. Click "Next" to proceed.
-
Ready to Install: Review your installation settings and click "Install" to begin the installation process. The installer will copy the necessary files to the specified installation directory. This process may take a few minutes.
-
Complete the Installation: After the files are successfully copied, you will see a completion message. Click "Finish" to exit the installer.
Congratulations! You have successfully installed Turbo C++ IDE on your Windows machine. You can now create new projects, write C++ code, compile and execute your programs, and explore the various features and tools provided by the IDE to enhance your programming experience.
-
Launch Turbo C++ IDE: To start using Turbo C++ IDE, locate its shortcut icon on your desktop or access it from the Start menu. Double-click on the shortcut, and the IDE will open.
-
Java Development Kit (JDK)
- JDK 7.5 (64 bit) is suitable for development and practice on older systems.
- JDK 8.21 (64 bit) is the latest version with enhanced features and performance improvements.
Below are the links to download and install the Java Development Kit (JDK) software for your practice. There are two different versions available.
Please ensure that you select the correct version based on your development needs.
Java Development Kit (JDK) is a software development kit used to develop Java applications.
It includes the Java Runtime Environment (JRE), an interpreter/loader (Java), a compiler (javac), an archiver (jar), a documentation generator (Javadoc), and other tools needed for Java development.
-
Description and How to install guide?
Java Development Kit (JDK) is a software development kit used to develop Java applications. It includes the Java Runtime Environment (JRE), an interpreter/loader (Java), a compiler (javac), an archiver (jar), a documentation generator (Javadoc), and other tools needed for Java development.
JDK 7.5 (64 bit) offers a stable environment for development on older systems and is compatible with a wide range of applications and frameworks.
JDK 8.21 (64 bit) includes enhanced features and performance improvements over previous versions, making it suitable for modern development needs.
To install JDK, download the appropriate version and follow the installation instructions provided. Ensure your system meets the minimum requirements for the selected version.
With JDK installed, you can compile and run Java applications, use various development tools, and build robust, scalable applications for a wide range of platforms.
TextPad
- TextPad 8.02 (64 bit) is suitable for basic text editing needs and supports various programming languages.
- TextPad 9.5 (64 bit) is the latest version with enhanced features and performance improvements.
Below are the links to download and install the TextPad software for your development needs. There are two different versions available.
Please ensure that you select the correct version based on your development environment and requirements.
TextPad is a powerful, general-purpose editor for plain text files. Easy to use, with all the features a power user requires.
-
Description and How to install guide?
TextPad is a powerful, general-purpose editor for plain text files. Easy to use, with all the features a power user requires.
TextPad 8.02 (64 bit) is ideal for basic text editing needs, supporting various programming languages and providing a stable environment for development.
TextPad 9.5 (64 bit) includes enhanced features and performance improvements over previous versions, making it suitable for more advanced text editing and development needs.
To install TextPad, download the appropriate version and follow the installation instructions provided. Ensure your system meets the minimum requirements for the selected version.
With TextPad installed, you can efficiently edit plain text files, source code, and more, leveraging its powerful features and user-friendly interface.
Step-by-step guide to install TextPad:
-
Download TextPad Installer: Click on the appropriate download link for TextPad 8.02 or TextPad 9.5 to download the installer.
-
Launch the Installer: Locate the downloaded installer file and double-click on it to launch the installation wizard.
-
Follow Installation Steps: Follow the prompts in the installation wizard to complete the setup process. Accept the license agreement, choose the installation directory, and proceed with the installation.
-
Complete the Installation: Once the installation is complete, click "Finish" to exit the installer.
You can now use TextPad for all your text editing needs, from simple notes to complex source code editing.
-
NetBeans IDE
- NetBeans 8.2 for JDK 8.0 is suitable for projects targeting Java 8.
- NetBeans 22.0 for JDK 17 and above is the latest version supporting the latest Java versions.
Below are the links to download and install the NetBeans IDE software for your development needs. There are two different versions available.
Please ensure that you select the correct version based on your development environment and requirements.
NetBeans IDE is a free, open-source integrated development environment (IDE) for developing with Java, PHP, C++, and other programming languages. It is easy to install and use straight out of the box and runs on many platforms including Windows, Linux, macOS, and Solaris.
-
Description and How to install guide?
NetBeans IDE is a free, open-source integrated development environment (IDE) for developing with Java, PHP, C++, and other programming languages. It is easy to install and use straight out of the box and runs on many platforms including Windows, Linux, macOS, and Solaris.
NetBeans 8.2 for JDK 8.0 offers a stable environment for development with Java 8, providing comprehensive support for the latest Java technologies.
NetBeans 22.0 for JDK 17 and above includes support for the latest Java versions, offering enhanced features and better performance.
To install NetBeans, download the appropriate version and follow the installation instructions provided. Ensure your system meets the minimum requirements for the selected version.
With NetBeans installed, you can develop robust, high-quality applications quickly and easily.
Step-by-step guide to install NetBeans:
-
Download NetBeans Installer: Click on the appropriate download link for NetBeans 8.2 or NetBeans 22.0 to download the installer.
-
Launch the Installer: Locate the downloaded installer file and double-click on it to launch the installation wizard.
-
Follow Installation Steps: Follow the prompts in the installation wizard to complete the setup process. Accept the license agreement, choose the installation directory, and proceed with the installation.
-
Complete the Installation: Once the installation is complete, click "Finish" to exit the installer.
You can now use NetBeans to develop applications with ease and efficiency, leveraging its powerful features and user-friendly interface.
-
Scene Builder
- Scene Builder 8.5.0 for Java 8 is suitable for projects targeting Java 8.
- Scene Builder 22.0.0 for Java 17 and higher is the latest version supporting the latest Java versions.
Below are the links to download and install the Scene Builder software for your practice. There are two different versions available.
Please ensure that you select the correct version based on your development needs.
Scene Builder is a visual layout tool that allows users to quickly design JavaFX application user interfaces, without needing to write any code. It provides a drag-and-drop interface for designing the user interface, which then generates FXML files that can be integrated with a Java application.
-
Description and How to install guide?
Scene Builder is a visual layout tool that allows users to quickly design JavaFX application user interfaces, without needing to write any code. It provides a drag-and-drop interface for designing the user interface, which then generates FXML files that can be integrated with a Java application.
Scene Builder 8.5.0 for Java 8 is ideal for applications targeting Java 8, providing a stable environment for development.
Scene Builder 22.0.0 for Java 17 and higher includes support for the latest Java versions, offering enhanced features and better performance.
To install Scene Builder, download the appropriate version and follow the installation instructions provided. Ensure your system meets the minimum requirements for the selected version.
With Scene Builder, you can create complex user interfaces for JavaFX applications easily and efficiently, leveraging its intuitive drag-and-drop interface.
Step-by-step guide to install Scene Builder:
-
Download Scene Builder Installer: Click on the appropriate download link for Scene Builder 8.5.0 or Scene Builder 22.0.0 to download the installer.
-
Launch the Installer: Locate the downloaded installer file and double-click on it to launch the installation wizard.
-
Follow Installation Steps: Follow the prompts in the installation wizard to complete the setup process. Accept the license agreement, choose the installation directory, and proceed with the installation.
-
Complete the Installation: Once the installation is complete, click "Finish" to exit the installer.
-
Integrate with IDE: You can integrate Scene Builder with your preferred Java IDE (like IntelliJ IDEA, Eclipse, or NetBeans) to design JavaFX interfaces directly from your development environment.
You can now use Scene Builder to design JavaFX application interfaces visually and efficiently.
-
MySQL Database
- MySQL 5.3.x is suitable for legacy systems and applications requiring this version.
- MySQL 8.0 is the latest version with enhanced features and performance improvements.
Below are the links to download and install the MySQL Database software for your practice. There are two different versions available.
Please ensure that you select the correct version based on your development needs.
MySQL is an open-source relational database management system (RDBMS). It is widely used for managing and storing data in various applications, including web applications, enterprise software, and more.
With MySQL, you can create, manage, and query databases efficiently.
-
Description and How to install guide?
MySQL is an open-source relational database management system (RDBMS). It is widely used for managing and storing data in various applications, including web applications, enterprise software, and more.
MySQL 5.3.x offers a stable environment for legacy systems and applications that require this specific version. It includes features like stored procedures, triggers, views, and more.
MySQL 8.0 is the latest version with significant performance improvements, enhanced security features, and advanced capabilities like JSON support, window functions, and more.
To install MySQL, download the appropriate version and follow the installation instructions provided. Ensure your system meets the minimum requirements for the selected version.
With MySQL installed, you can create, manage, and query databases efficiently, making it a versatile choice for a wide range of applications.
Step-by-step guide to install MySQL:
-
Download MySQL Installer: Click on the appropriate download link for MySQL 5.3.x or MySQL 8.0 to download the installer.
-
Launch the Installer: Locate the downloaded installer file and double-click on it to launch the installation wizard.
-
Choose Setup Type: Select the setup type based on your requirements (Developer Default, Server only, Client only, Full, Custom).
-
Configure MySQL Server: Follow the prompts to configure MySQL Server, including setting up the root password, creating a user, and configuring the MySQL service.
-
Complete the Installation: Review the installation summary and click "Execute" to begin the installation process. Once completed, click "Finish" to exit the installer.
You can now use MySQL Workbench or other tools to connect to your MySQL server, create databases, and manage your data efficiently.
-
SQLYog
- Visual Data Design
- Query Builder
- Data Import/Export
- Scheduled Backups
- SSH and HTTP Tunneling
- Data Synchronization
SQLYog is a powerful MySQL management tool, combining the features of MySQL Administrator, phpMyAdmin, and other MySQL Front Ends and MySQL GUI tools. It is easy to use, allowing for efficient database management and optimization.
SQLYog is available for Windows and includes a wide range of features for database administration and optimization.
-
Additional Information
SQLYog is widely recognized as the best MySQL GUI tool, providing a powerful interface for managing and optimizing MySQL databases. It simplifies complex database management tasks with a user-friendly interface.
The tool offers advanced features such as visual query builder, schema design, data export/import, and synchronization. It also supports scheduled backups, SSH and HTTP tunneling, and real-time query profiling.
SQLYog enables efficient database administration, allowing users to create, modify, and delete databases, tables, and records with ease. The tool also provides robust data management features, including the ability to filter, sort, and search data quickly.
To start using SQLYog, download the installer using the button above and follow the installation steps:
- 1- Download the SQLYog installer.
- 2- Launch the installer and follow the on-screen instructions.
- 3- Complete the installation and start using SQLYog for your database management needs.
SQLYog is compatible with Windows operating systems and is designed to handle databases of all sizes, making it an essential tool for database administrators and developers.
.png)

